We can create and manage email campaigns and can see the campaign statistics here.

Create Campaign
We can create a new email campaign here.
We can create 3 types of campaigns. Newsletter, Autoresponder and Date trigger.
In the newsletter type campaign, we can send emails directly to a list.
In the autoresponder we can send a mail as a follow up to the parent campaign.
In the date trigger campaigns, we can send mail based on the date field used (such as birth day, anniversary etc.).
A new email campaign creation process is given below.

1. Campaign Name : Enter the campaign name here.
2. Is Campaign Follow up: For a standard newsletter you can use the option “No” and for an auto responder please use the option “Yes”.
In the follow up campaign, you need to select the parent campaign. Also we are using the same filter settings and target list of the parent campaign in the auto responder.

3. Target List : You can select the list to which the campaign is fired.
4. Email Type : We can select the html email or plain text email type here.
5. Select Template : We can select the template here if we have one for the campaign.
6. Mail Subject : You can enter the subject of the campaign here.
7. Select Required Custom Fields for the body : Here we can select the custom fields, email edit option, unsubscription link etc. and add them to the email content.
8. Body Content : We can add the email content here.
9. Redirection Link after Unsubscription : We can add the link to the page where the user redirects after unsubscription.

10. Send email to subscribers who joined after the campaign started : You can use the option “Yes”, if you want to send emails to subscribers who joined after the campaign started. Otherwise use the option “No”.
11. Batch Size: This is the number of emails (batch) that we send in a single execution. If the batch size is 100 and the total emails in a list is 1000, you need to send the campaign 10 times to complete it.
12. Sender Name : This is the name of the sender.
13. Sender Email : This is the email of the sender.
14. Filter Settings: In the filter settings we can send emails based on the custom fields. Here we can select the custom field and operator. There are different operators.

The different operators are = (equal to), != (not equal to), > (greater than), <(less than), >=(greater than or equal to), <= (less than or equal to) and regex. In the regex, we can use a pattern to match with the custom field.
(Example : Consider we have a custom field “Sex” with values “Male and Female”. If you want to send a mail to Female only, you can use the option sex = Female, and the system will send emails to female users only.)
Trigger Settings
We have 3 types of trigger settings. Date based trigger, subscription based trigger and date field based trigger.

In the date based trigger we can set a start time and end time to the campaign.
If you want auto restart of the campaign weekly, monthly or yearly, you can select that option too.

In the subscription based trigger, we can send a mail “X” days after the subscription is active/pending/unsubscribed.

In the trigger based on a date field, we can send a campaign based on the date field used in our subscription.
In this we can choose the date fields and select the trigger condition. We have 4 trigger conditions.
1. On the date (The exact date including the year) of the date field entry.
2. On every anniversary of the date – It can be used to send a mail every year on the exact date.
3. “X” days before the date – Here we can send an email “X” days before the date field entry.
4. “X” days after the date – We can send an email “X” days after the date field entry here.
We can also set the start time and end time for the campaign.

We can also add attachments with the campaign. Here we can choose a file to attach and add an id to this attachment.
The attachment id is an optional one.
If you want to embed an image with your html campaign, add an id for the attachment and use the same id in the src attribute of the img tag.
For example, if the id of the attachment image is img001, please use the image tag as <img src=”cid:img001″/>
Also please note that use the id in attachment only once.
Manage Campaigns
In this section we can see all the campaigns present and can manage them.
We can see all the campaigns in 2 ways.
1. Simple View – Here all emails are listed separately as given below.

2. Hierarchy View – All emails are listed as hierarchical model. It is easy to find the parent and child campaigns here.

There is a ‘+’ symbol for the parent campaign. To see the child campaigns, click the ‘+’ symbol and we can see all child campaigns.
To change the view, we can click on the button (Hierarchy View and Simple View) in the top of the page.
Here we can see the type of the campaign, number of attachments and status of the campaign.
The different actions are given below.
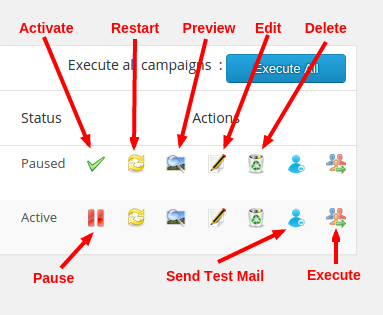
Pause – We can pause a campaign by clicking this link.
Activate – We can activate the campaign by clicking this link.
Restart – To restart the campaign, click on this link.
Preview – We can see the preview of the campaign by clicking on this link.
Edit – To edit the campaign, click on the link.
Delete – We can delete the campaign by clicking on this link.
Send Test Mail – To send a test email for testing purposes, we can use this link.
Execute – We can send (execute) the email campaign by clicking on this link.