1. Upload the Files to server
After purchasing the XYZ Classifieds you can download the package from your XYZScripts Member Area.
Details are available in How to download the script/plugin?
Unzip the XYZ Classifieds package onto your local hard drive.
Using an FTP program (such as Filezilla, which is free, or CuteFTP,AceFTP etc.), login to your web server and copy the XYZ Classifieds files across into your base website directory or in a sub directory.
The base directory is commonly called ‘public_html’, ‘html’, ‘www’ or ‘website_html’. If you’re not sure what it is, your web host provider will be able to tell you.
You can also upload your files to the server using the file upload option in your control panel. Most modern control panels like cpanel, plesk, webmin etc. , provide the file upload option.
2. Change the File Permissions
XYZ Classifieds requires the following files/directories to have ‘write’ permissions set.
If you’re running on a Linux or Unix web host, you can use your FTP program and use the ‘CHMOD’ (‘Change Mode’) function to grant write permissions.
If your host is running Windows, you will need to contact them about setting up write permissions on these files/folders. Also, if a folder listed here doesn’t exist, please create it.
Folders, CHMOD these to 777:
• /data
3. Create MySQL Database
XYZ Classifieds makes use of a MySQL database to store your data.
This database must be created before you run the XYZ Classifieds installation wizard. Your database user account should also have full grant access to that database. You will need the database connection details during the setup wizard.
Setting up your database may differ with your web host and what software they use for your web hosting control panel:
- If your web host is running ‘cPanel‘, read this guide
First, login to your CPanel account. If you don’t have your username and password, you’ll
Once you’ve logged in, select MySQL databases from the list.
Type in a name for your new database and click the “Create Database” button in the Create New Database section.
Then, type in a Username and a Password into the relative fields and click the “Create User” button MySQL Users- Add New User section.
Once your Database and User have been created, you need to give that user permission to use that database. We do this by selecting the username we created from the drop down and the database we created from the drop down, making sure the “All” check box is selected and clicking the “Add User to Database” option.
Note that the Username and Database will be prefixed with your Cpanel login name. For example, if you created a database called DB and your cpanel login was mysite then your new database will be mysite_db.
You can also use the MySQL Database Wizard to create the database.
That’s it. You’re now ready to use the MySQL database that you just created.
need to contact your web hosting provider.
- If your web host is running ‘Plesk‘, read this guide.
First, login to your Plesk account. If you don’t have your username and password, you’ll need to contact your web hosting provider.
Once you’ve logged in, click on the Databases icon.
When you reach the next page, you will need to click on the ‘Add New Database’ icon.
Type in a name for your new database, make sure type is set to MySQL and click “OK”.
On the next screen you should see a database created successfully message. You now need to add a user. So select the “Add New Database User” icon below the success message.
Fill in the details on the form with your desired username and password.
You should now have all the details for your database. If you are not given a “host”, try “localhost”. If that does not work, you will need to contact your hosting provider to ask what your MySQL Host is.
That’s it. You’re now ready to use the MySQL database that you just created.
- If your web host uses a different website control panel, read this guide.
Create a database using PHPMyAdmin – PHPMyAdmin is a database tool that you can use to create and modify databases on your web server. Most hosting providers will create a link to PHPMyAdmin from their control panel. Once you find the link, simply click on it and PHPMyAdmin will open up.
You should see a field that’s labeled “Create a new database”. In the text box, simply type in a name for your store’s database, such as “websitedb” and click the “Create” button. Your new MySQL database will then be created and is ready to use.
Create a database in your control panel – If you’re web hosting provider isn’t running PHPMyAdmin then they might offer an alternate way to create a database from your hosting control panel. Look for a link that says something like Create database, New database, Add MySQL database, etc. You should then be asked for a name for your database. Enter something such as “websitedb”.
Ask your web hosting provider to create a database – Failing everything else, you can simply email or call your web hosting provider and ask them to create a database for you. Make sure you ask them to send you back an email that contains your MySQL user, password, hostname and database name.
4. Setup Procedure
XYZ Classifieds includes a simple one step installation process.
Run YOUR_SCRIPT_INSTALLATION_PATH/installation/ in the web browser.
In the first step, you need to enter the database details, base path and the email address registered in xyzscripts.com
STEP 1:
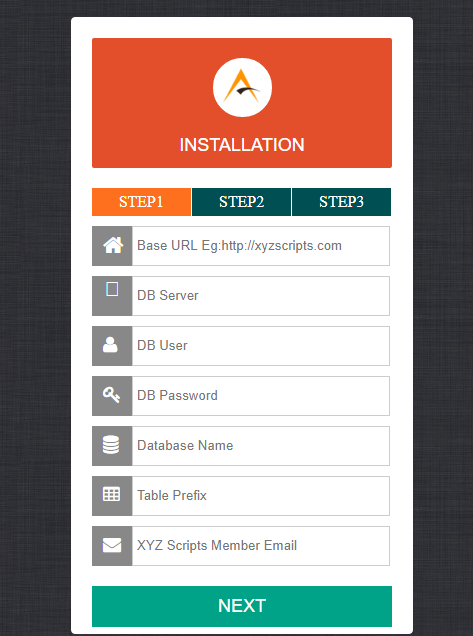
Here enter the details and click next.
If the entered values are correct and the system can automatically create the system file, you will redirect to STEP 3.
If there is any issue in creating the system file you will be redirected to STEP 2.
STEP 2:
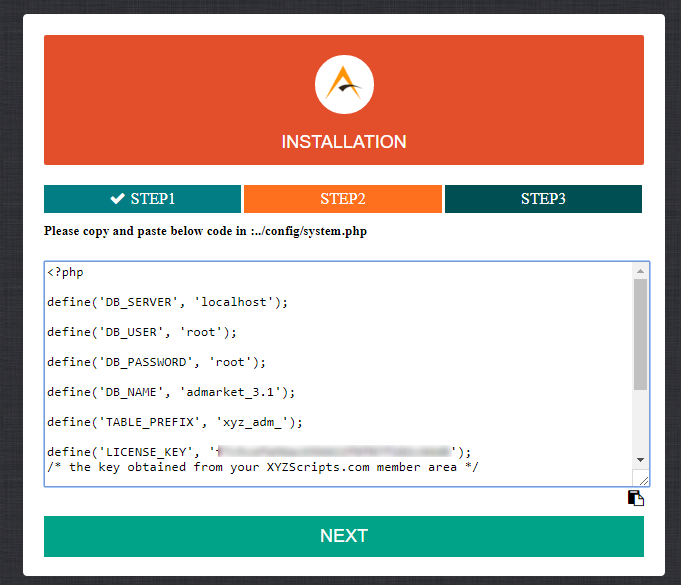
In step 2, it will show the code and please copy this code and paste it in the file “system.php” in “config” folder.
If there is no such file, please create the file with name “system.php” and paste the code and save.
After saving the file, please click the next button.
STEP 3:
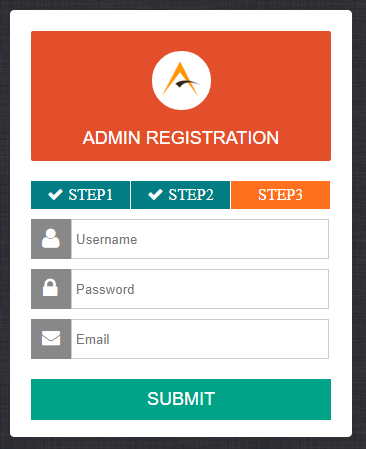
In step 3, you can enter the admin login username, password and email address and submit the form.
The installation is complete now and you will get the confirmation.
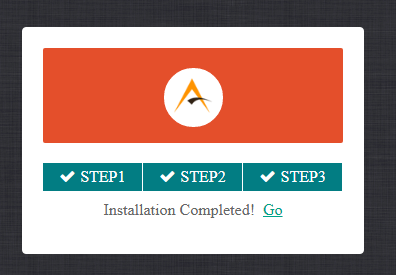
Congratulations, you are now ready to login to the XYZ Classifieds control panel and start adding content!
Your control panel will be accessible by your script installation URL.
Note 1: For the proper working of the statistics you need to set the cron job in your server. In the “Admin Home” page you can see the cron command. Please add this cron command in the cron job of the server with a time frequency of “Every Hour”.
Details of setting cron job is given in the following links.
How to setup Cron job in cpanel?
How to setup scheduled task in plesk panel?
Installation of Addons :
Please download the addon from the member area, unzip the addon and upload the unziped addon folder to the ‘addons’ directory in the script. Now in the admin area > Manage addons, please activate the addon.