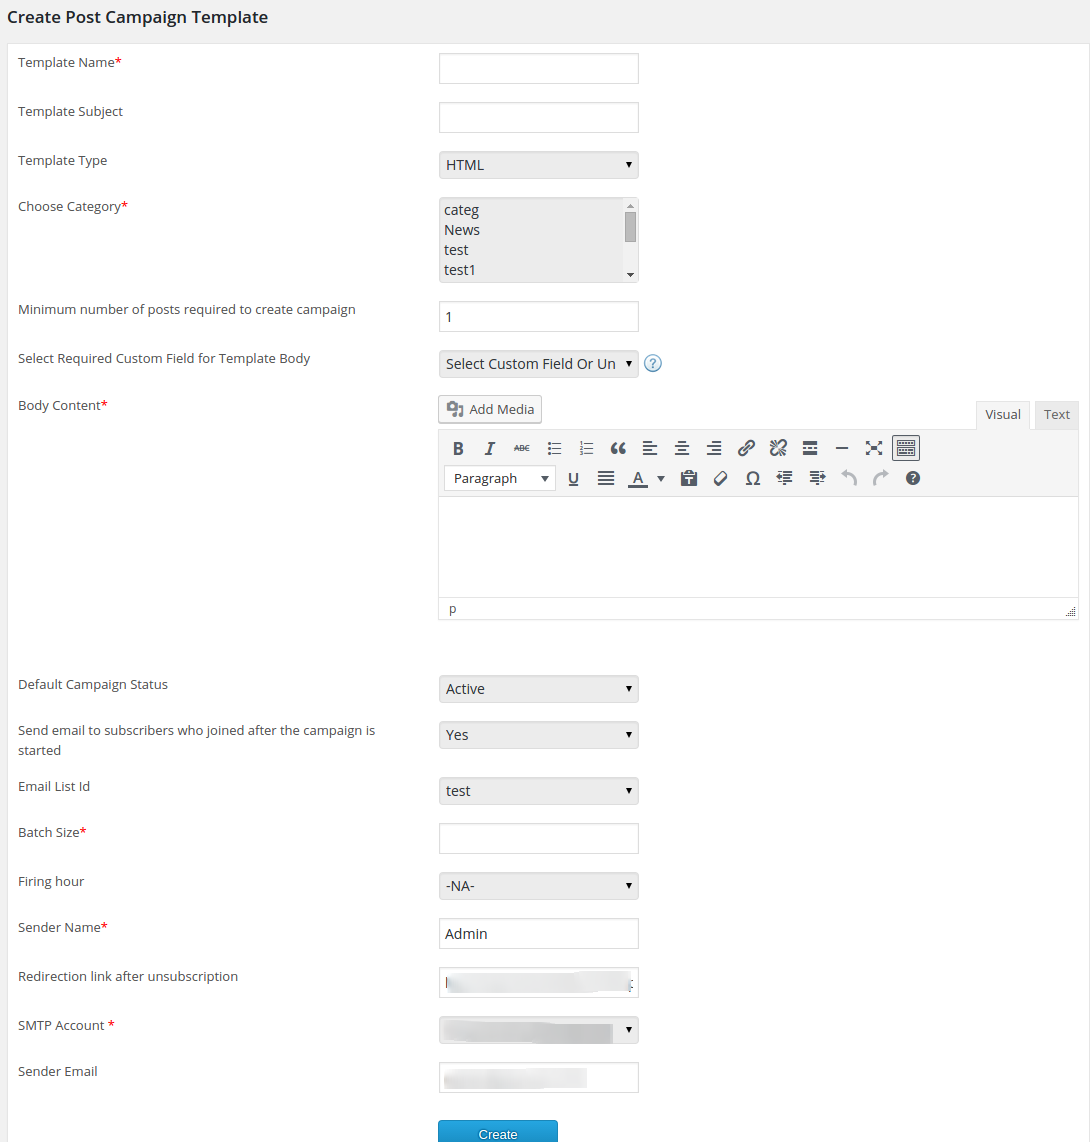
The post templates are the templates used to create a campaign from the post directly.
We can see and create post templates for the email campaigns created by new posts.

We can see the template name, type, category and status here.
To create a new template, click on the “Add New Campaign Template” button.

Template Name – This is the name of the template. You can add any name to this template.
Template Subject – This is the subject of the Template. This template subject is used as the campaign subject by default.
Template Type – We can use HTML or Plain text here.
Choose Category – We can select the category of the wp site for this template.
Minimum number of posts required to create campaign – Here you can select the number of posts required to create the campaign. If the selected value is 2, it will create a campaign using 2 posts.
If you are using more than one post, enclose the post related fields within the variables {post-details-start} and {post-details-end}.
Select required custom field for the template body – Here we can select the custom field we want to use with the template.
The different fields are custom fields in the plugin, category name, post related fields like name, id, url, publish date, author, content, excerpt, featured image (full size, thumbnail) etc.
Body content – This is the content of the template. To add a custom field here, enter the cursor in the specified location and select the field from the above dropdown menu.
Default Campaign Status – We can set the default status of the campaign here. We can select the ‘Active’ or ‘Pending’ option.
Send email to subscribers who joined after the campaign is started – We can select the desired option here. If the selected value is “Yes”, it will send email to the subscribers who subscribed after the campaign is started.
Email List Id– This is the email list to whom we want to send email.
Batch size – This is the number of emails to be send in a single execution. It is recommended to use a value for batch size depending on the server limitation.
That means, if your server allows you to send only 100 emails in an hour, please use a value below 100 as batch size.
Firing Hour – We can set the firing hour of the campaign. If we set 10 as firing hour, it will execute at 10 AM only.
Sender Name – This is the name of the email sender.
Redirection link after unsubscription – If we want to display a special page to the user who unsubscribed from the list, enter the path here.
SMTP Account – Admin can select the SMTP account, if you are using the SMTP for sending emails.
Sender Email – Enter the email of the sender here (If phpmail function is using for sending emails).
Click the “Create” button to create the campaign.