The Settings page contains different settings of the Newsletter Manager plugin and these are grouped into different sections. Each section is described below in detail.
General
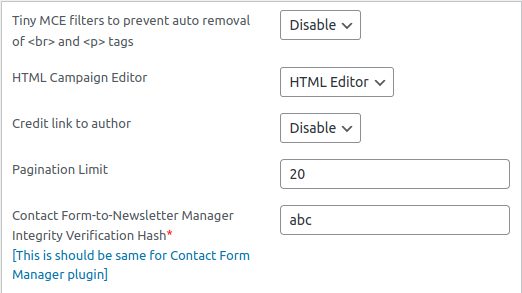
Tiny MCE filters – This filter allows you to prevent the auto removal of <br> and <p> tags from the WordPress editor.
HTML Campaign Editor – We are using the WordPress HTML editor and the Text editor to create email campaigns.
To create beautiful HTML campaigns, select the “HTML Editor” as the HTML Campaign Editor. For slow networks and plain mail content, you can use the “Text Editor“.
Credit Link To Author – You can enable this to help us (Author of Newsletter Manager Plugin) by adding a credit link in your site.
Pagination Limit – This setting gives you the freedom to set the number of records to be displayed in a page.
If you want to set 50 rows (of emails or campaigns) in a single page, please set the pagination limit as 50.
Email Sending Settings
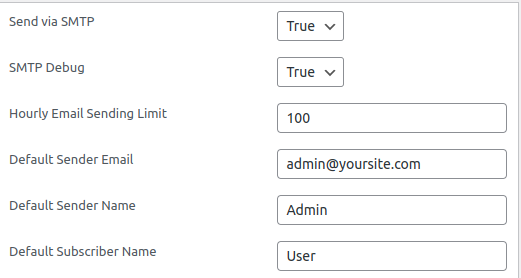
Send via SMTP – In some server it won’t allow you to send emails using PHP mail function. In such conditions you can use the option SMTP mailing.
For this you need to enable the SMTP feature and set the SMTP settings in XYZ Newsletter> SMTP Settings Page.
SMTP Debug – You need to enable this only to find out the error messages if any.
By enabling this, you can find all the errors related to SMTP
Hourly Email Sending Limit – In most shared hosting and some VPS hosting servers, there is a limit for sending emails in an hour.
If your host allows you to send only 100 emails per hour, you can enter this limit in the “Hourly Email Sending Limit” section and the system will send only 100 emails per hour.
Default Sender Email – This is the default sender email address to be used with outgoing emails. You can change the email address for each campaign. This is the PHP mail setting and is applicable only if the SMTP is disabled.
Default Sender Name – This is the name of the default sender for all out going mails. You can override this for each campaign. This is the PHP mail setting and is applicable only if the SMTP is disabled.
Default Subscriber name – This is the default name of the subscriber if no name is added with the email address during subscription.
You can use “Friend” , “User” etc. for this field. When you send emails by addressing them with their name, this default name will be included, if there original name is not available in the list.
Subscription
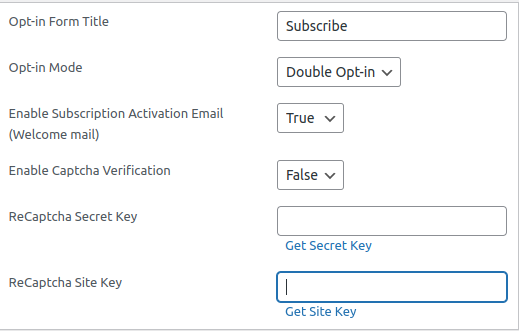
Opt-in Form Title – This is the title of the opt-in form/ subscription form. This title will be displayed in the subscription form.
You can use “Subscription Form”, “Subscribe Here” etc. as the opt-in form title.
Opt-in Mode – This is the subscription activation method. Two subscription modes are available now.
- Single opt-in
- Double opt-in
In the ‘single opt-in’, users can subscribe to your newsletter by simply filling up the subscription form. There is no confirmation mail to activate the subscription.
In ‘double opt-in’ mode, we are sending a confirmation mail to the user after filling up the subscription form. The user is added to the email list only after the email confirmation. This is the most widely used subscription mode.
We recommend the Double opt-in mode which suits for the anti-spam laws.
Page to be redirected after subscription (absolute path) – This is the page the user redirected after filling up the subscription form. If you have a specific page, you can use that link.
While adding the path, please use the absolute path with http:// prefix.
Note: During the installation of the Newsletter Manager Plugin, 3 pages are created automatically.
These are ‘Email Subscribed’ , ‘Subscription Confirmed’ and ‘Email Unsubscribed’.
In the ‘Page to be redirected after subscription‘ section we are using the ‘Email Subscribed‘ page by default. If you do not have a separate redirection page, you can use this page.
You can edit the content of the thanks page in “newsletter-manager/shortcodes/thanks.php”
Page to be redirected after email confirmation (absolute path) – This is the page the user redirected after confirming the subscription by clicking the confirmation link. If you have a specific page for this purpose, you can specify that link.
While adding the path, please use the absolute path with http:// prefix.
In the ‘Page to be redirected after subscription‘ section we are using the ‘Subscription Confirmed‘ page by default. If you do not have a separate redirection page, you can use this page.
You can edit the content of confirmation page in “newsletter-manager/shortcodes/confirm.php”
Enable Subscription Activation Mail (Welcome Email) – If you want to send a welcome email to the user after completing the subscription, you need to enable the Subscription Activation Mail (Welcome Email).
In the single opt-in mode, the system will send a welcome mail after filling up the subscription form and in the double opt-in mode, the welcome mail will send after the user confirming the subscription by clicking the confirmation link.
Unsubscription

Page to be redirected after unsubscription (absolute path) – This is the page to which the user redirected after unsubscribing from the list. If you have a specific page, you can use that link as redirection page.
In this section we are using the ‘Email Unsubscribed‘ page by default. If you do not have a separate redirection page, you can use this page.
You can edit the content of the unsubscription page in “newsletter-manager/shortcodes/ unsubscribe.php”
Enable Email on Unsubscription – If you want to send a mail to the user after unsubscribed from the list, please use this option. It will send a mail after unsubscription.
Other Settings

Hide premium version ads – You can hide the “Buy premium plugin” ad by enabling this option.
Notification Messages
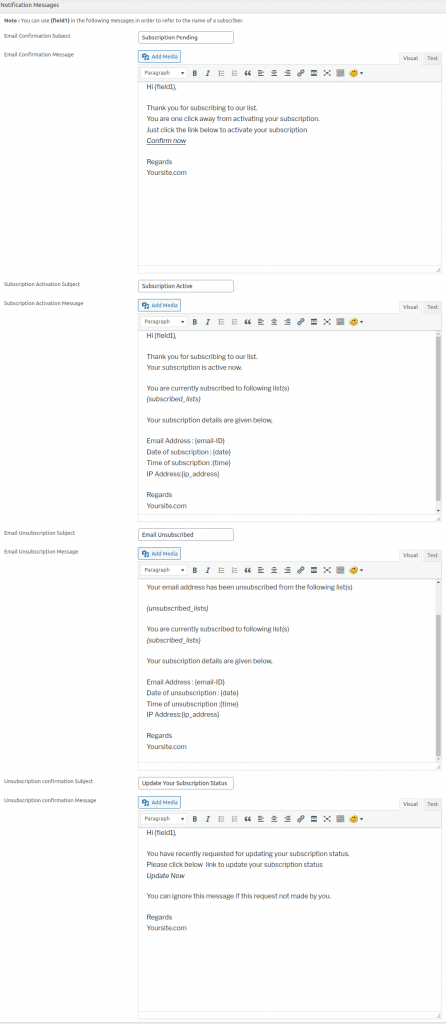
Email Confirmation Subject – This is the subject of the subscription confirmation email. This message is applicable only in the double opt-in mode.
Email Confirmation Message – This is the body of the subscription confirmation email. This mail contains the link for confirming the subscription.
Note: Be careful while editing the Email Confirmation Message. DO NOT remove the {confirmation_link} from the message. This link is viewable if you edit the message using the html tab instead of visual tab.
The code {confirmation_link} will be replaced with the original link.
Subscription Activation Subject – This is the subject of the subscription activation notification mail.
This is the mail after clicking the confirmation link in double opt-in mode or after completing the subscription form in the single opt-in form.
Subscription Activation Message – This is the body of the subscription activation notification mail.
Email Unsubscription Subject – This is the subject of the unsubscription email.
Email Unsubscription Message – This is the body of the email unsubscription notification message.
Others

This section provides some information about the cron job/scheduled task and short codes.
Cron Job Command – If you want to automate the emails/newsletter , you need to set the cron job/ scheduled task in your server.
The command to run the cron job/ scheduled task is given in this section. To set the cron job, go to your server control panel(cpanel, plesk etc.), select the cron job/ scheduled task and add this command in the cron section.
Also select the appropriate time schedule to run the cron job. We recommend setting the cron job to run once every hour.
You can see more details in https://kb.xyzscripts.com/can-i-send-emails-automatically-without-clicking-the-send-button/
Shortcode to be used in page after subscription – If you want to add the thanks message for subscription in your wordpress page, you can use this shortcode.
Shortcode to be used in page after email confirmation – You can use this shortcode in a wordpress page to display appropriate message to your users after email confirmation.
Shortcode to be used in page after unsubscription – This shortcode can be used in the wordpress pages to show proper message where the users get redirected after unsubscription.