You can see all email campaigns and their status here.
The newly created campaigns are in Pending status and you need to activate it manually.
You can activate or pause the campaign, restart a campaign at any time, preview, edit or delete a campaign, send a test mail and execute the campaign to the list.
We are using some images for the actions. You can see the action name when you mouse over to the image. The details are given below.
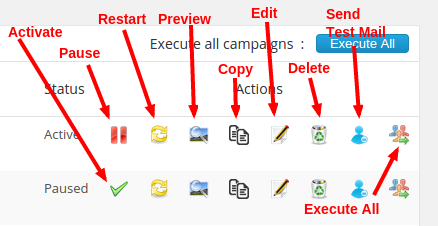
Activate Campaign : Click this image link to activate a campaign.
Pause Campaign : This image link is used to pause a campaign
Restart Campaign : This link is used to restart a campaign. When we restart a campaign, it will send the same message to all email addresses in the list again.
Preview Campaign : Click this link to see the preview of the campaign.
Copy Campaign : Use this link to copy the campaign.
Edit Campaign : To edit the campaign use this link
Delete Campaign : This link is used to delete an email campaign
Send Test Mail : Click this image link to send a test mail. You can send the campaign to your email address to check how this appearing in the emails.
Note: The variables like {field1}, unsubscription link etc. will not work in the test mail.
Execute Campaign : Click this image to send the campaign to the list manually
If you want to send all the campaigns manually, please use the button “execute all”.
It will also display the basic statistics like the attachments with the campaign, number of emails sent, number of emails remaining, number of emails opened, start time and the last mail fired time.
Note 1: We are using an image embed with the campaign to track the opened emails. If the image is not displayed in the browser, we cannot track the email even if it is opened. So the opened statistics is not 100% correct.
Note 2: To send emails automatically, you need to set the cronjob in your server. Please click the link to know more about Can I send emails automatically without click the send button?
Create Campaign
Please click the “Create Campaign” button in this section to create a new campaign.
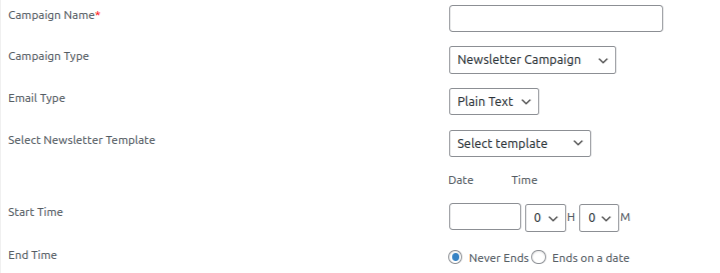
Campaign name – This is the name of the campaign.
Campaign Type – We have 2 types of campaigns here, Newsletter campaign and confirmation campaign. The newsletter campaign is the ordinary campaign used to send a newsletter. The confirmation campaigns are the campaigns used to send confirmation mail to users with pending state and is used to confirm the subscription status.
Email type – You can use plain text or HTML for creating email campaigns.
Start Time – You can set the start time of the email campaign with date and time.
Consider, you want to send a newsletter in a particular date and time. You can create the campaign in an earlier date and specify the starting time of the campaign. The campaign starts to execute on the starting time only.
You can leave this setting if you want to send the campaign soon.
End Time – If you want to stop the email campaign after a particular date and time, use this option. Here you can enter the date and time to end the campaign. Use “Never Ends” option if you want to continue a campaign without any time frame.
Next comes the mail subject and body of the campaign.
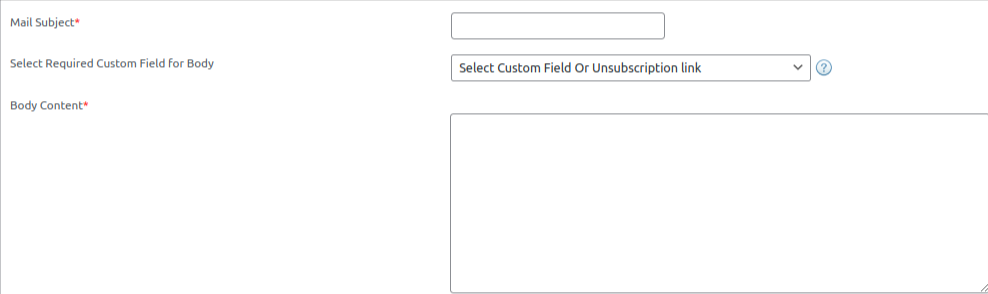
In the body we can use template variables for unsubscription link, custom fields etc.
We can select the custom field or the unsubscription link from the dropdown menu.
The different parameters are given below.
- {unsubscribe-url} – It will be replaced by the unsubscribe link and when the subscriber click on this link in the mail, they can unsubscribe from the email list.
- {email-edit-url} – This will be replaced by the email preference edit link and when the user click on this link they can edit the email preference.
- {web-preview-url} – This will be replaced by the web preview link and on clicking this link the user can see the mail in web view.
- {email-ID} – This will be replaced by the email address of the subscriber.
If we are selecting the email type HTML, we will get an option to add alternative body content. The alternative body content is displayed in the browsers/situations where the HTML display is not possible.
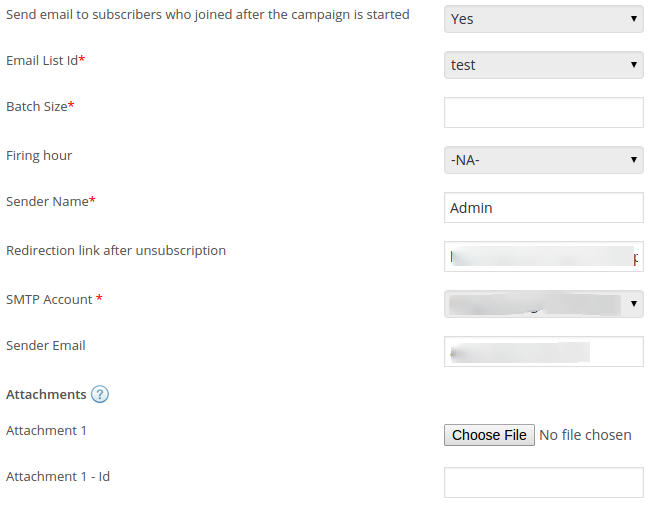
Send email to subscribers who joined after the campaign is started – We can select the option here. If we do not want to send email to users who subscribed the newsletter after the campaign is started, select the option “No”.
Email List Id – You can select the email list to which you want to send emails. Here you can send a campaign to a particular list only.
Batch size is the number of emails to be send in a single execution. It is recommended to use a value for batch size depending on the server limitation.
That means, if your server allows you to send only 100 emails in an hour, please use a value below 100 as batch size.
Firing Hour – This is the time for sending the campaign. If you set firing hour as 10, it will send at 10 AM only.
Sender name and emails are the name and email of the sender. If you have already set the default sender name and email, those values will be displayed here. You can change these values for each campaign.
You can also add attachments with the campaign.
With the attachments you can add the “id” of the attachments. The “id” of the attachment will help you to embed attached images with the campaign.
For example if you want to embed an image with the campaign, first upload the image using attachment. Now add an “id” to this attachment, say img001. Now in your campaign, you can use <img src=”cid:imf001″ /> to embed the image.
Note 1: Some email clients do not support all file extensions with the campaign. So please try to use some common standard file extensions like zip, rar, pdf, image formats with the campaign as attachments.
Note 2: The emails campaigns are in pending state after creating a new campaign. You need to Activate it manually from XYZ WP Newsletter > Email Campaigns section.
Note 3: To send emails, you need to click the send button manually.
To send emails automatically, the cron feature should be enabled in your server. Please check the link to know Can I send emails automatically without click the send button?
Note 4: You can save a campaign as draft by clicking on the “Draft” button. The auto save feature is not available in the campaign.
Note 5: We can auto create a campaign while creating a post in the site. For this you need to enable this option in the settings in the create/edit post pages.